
kubeadm is a tool which is a part of the Kubernetes project. It helps you deploy a Kubernetes cluster but it still has some limitations and one of these is that it doesn’t support multi-master nodes (HA). This article will show you the way to create a HA Cluster with kubeadm.
Contents:
- 1.1. Installing bare-metal server and creating necessary VMs
- 1.2. Installing docker kubelet kubeadm kubectl kubernetes-cni on master nodes and worker nodes
- 1.3. Installing HAproxy load balancer
2. Creating HA cluster with kubeadm
- 2.1. Steps for the 1st master node
- 2.2. Steps for the rest of the master nodes
- 2.3. Installing workers
1. Preparation
1.1. Installing bare-metal server and creating necessary VMs
The bare-metal server runs Ubuntu Server 16.04 and there are 7 Virtual Machines (VMs) will be installed on it. Both of the VMs also run Ubuntu Server 16.04.
- 3 master nodes
- 3 worker nodes
- 1 HAproxy load balancer
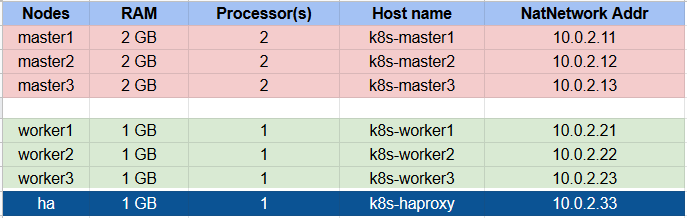
The configurations of nodes
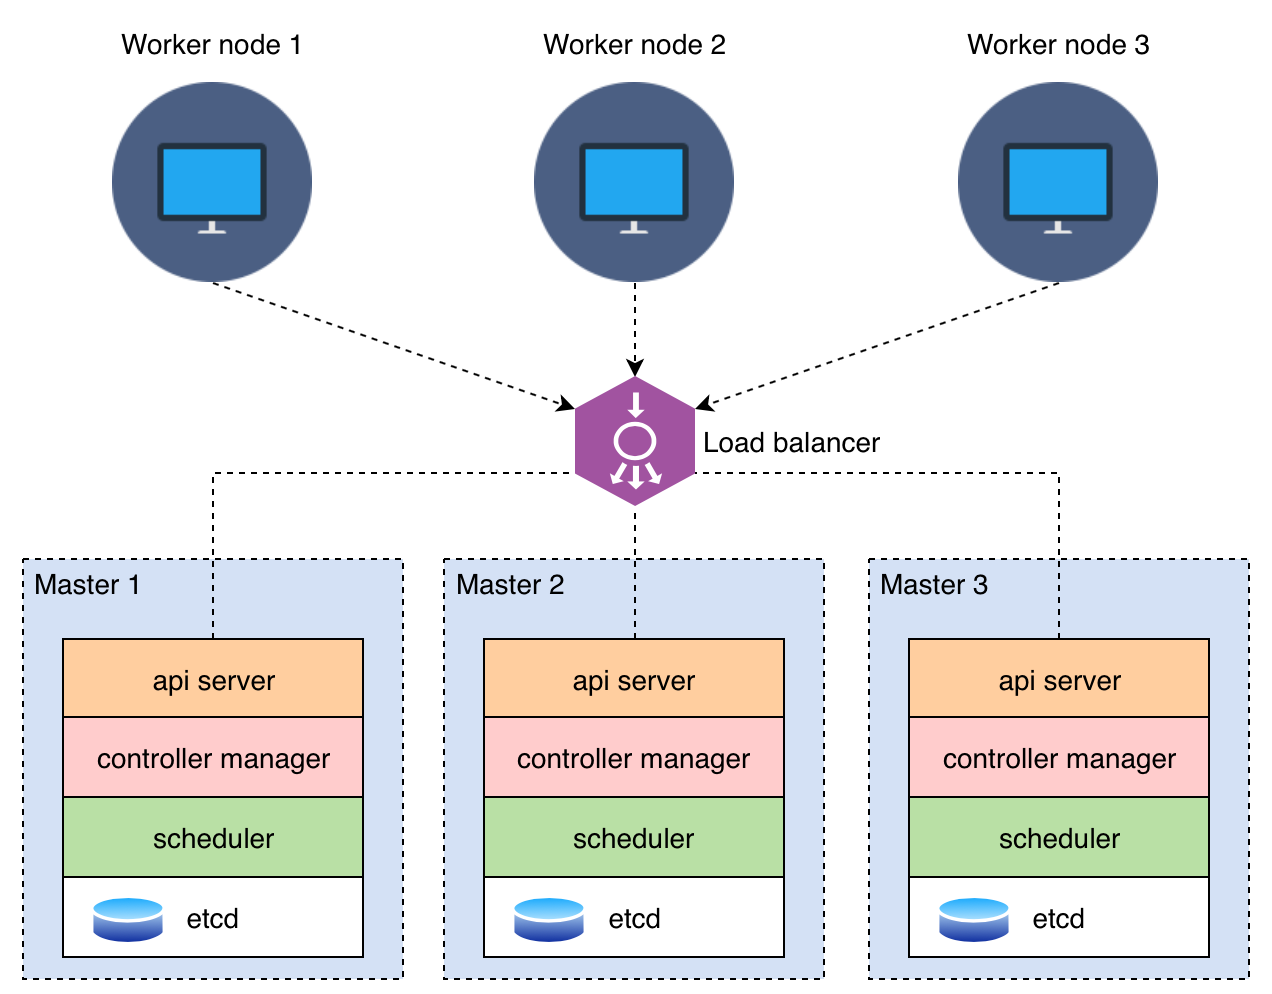
The stacked etcd cluster
1.2. Installing docker kubelet kubeadm kubectl kubernetes-cni on master nodes and worker nodes
Adding kubernetes repo:
$ curl -s https://packages.cloud.google.com/apt/doc/apt-key.gpg | apt-key add -
$ echo "deb http://apt.kubernetes.io/ kubernetes-xenial main" >> ~/kubernetes.list
$ sudo mv ~/kubernetes.list /etc/apt/sources.list.d
$ sudo apt-get update
$ sudo apt-get install -y docker.io kubelet kubeadm kubectl kubernetes-cni --allow-unauthenticated
If your machines (all of the above VMs) run behind the **proxy, please follow the instructions below. If NO, skip it and go to section 1.3**
Configuring proxy for apt
$ sudo vim /etc/apt/apt.conf

Acquire::http::proxy "http://[Proxy_Server]:[Proxy_Port]/";
Acquire::HTTP::proxy "http://[Proxy_Server]:[Proxy_Port]/";
Configuring proxy for docker
$ sudo mkdir -p /etc/systemd/system/docker.service.d
$ sudo vim /etc/systemd/system/docker.service.d/http-proxy.conf

[Service]
Environment="HTTP_PROXY=http://[Proxy_Server]:[Proxy_Port]/"
1.3. Installing HAproxy load balancer
Installing haproxy on ha machine (IP: 10.0.2.33)
$ sudo apt-get install haproxy
Configuring HAProxy to load balance the traffic between 3 master nodes.
$ sudo vim /etc/haproxy/haproxy.cfg
Modifying content of file haproxy.cfg as below:
global
        log /dev/log    local0
        log /dev/log    local1 notice
        chroot /var/lib/haproxy
...
...

frontend kubernetes
        bind 10.0.2.33:6443
        option tcplog
        mode tcp
        default_backend kubernetes-master-nodes

backend kubernetes-master-nodes
        mode tcp
        balance roundrobin
        option tcp-check
        server k8s-master1 10.0.2.11:6443 check fall 3 rise 2
        server k8s-master2 10.0.2.12:6443 check fall 3 rise 2
        server k8s-master3 10.0.2.13:6443 check fall 3 rise 2
-
The health check for an apiserver is a TCP check on the port which the kube-apiserver listen on. The default value: 6443
-
In frontend section: bind to
ha machineIP address (10.0.2.33) -
In backend section: Notice the hostname and IP address of 3 master nodes
Restart the HAproxy
$ sudo systemctl restart haproxy.service
2. Creating HA cluster with kubeadm
2.1. Steps for the 1st master node
On the master node master1 (IP: 10.0.2.11), create a configuration file kubeadm-config.yaml:
apiVersion: kubeadm.k8s.io/v1beta1
kind: ClusterConfiguration
kubernetesVersion: stable
apiServer:
  certSANs:
  - "10.0.2.33"
controlPlaneEndpoint: "10.0.2.33:6443"
-
The
kubernetesVersionis the Kubernetes version which is using. This configuration usesstable -
The
controlPlaneEndpointis theha machine’s IP address with port 6443
Deploying node master1:
$ sudo kubeadm init --config=kubeadm-config.yaml
The terminal will print something like this:
...
You can now join any number of machines by running the following on each node
as root:

kubeadm join 10.0.2.33:6443 --token 7ju4yg.5x2xaj96xqx18qwq --discovery-token-ca-cert-hash sha256:4d7c5ef142e4faca3573984119df92a1a188115723f1e81dbb27eeb039cac1e0
Save the output kubeadm join 10.0.2.33:6443 –token… to a text file in order to join other master nodes to the cluster.
Applying the Weave CNI plugin:
$ sudo kubectl apply -f "https://cloud.weave.works/k8s/net?k8s-version=$(kubectl version | base64 | tr -d '\n')"
Verifying that the pods of the components are ready:
$ sudo kubectl get pod -n kube-system -w
NAME                                  READY   STATUS    RESTARTS   AGE
coredns-86c58d9df4-8vcxh              1/1     Running   0          4h38m
coredns-86c58d9df4-ts6x2              1/1     Running   0          4h38m
etcd-k8s-master1                      1/1     Running   0          4h37m
kube-apiserver-k8s-master1            1/1     Running   0          4h37m
kube-controller-manager-k8s-master1   1/1     Running   0          4h37m
kube-proxy-dhnjk                      1/1     Running   0          4h38m
kube-scheduler-k8s-master1            1/1     Running   0          4h37m
weave-net-cqb88                       2/2     Running   0          4h22m
Make sure that after the 1st master node has finished initializing, then join new master nodes.
Copy the certificate files from the 1st master node to the master2 and master3
$ vim copy.sh

USER=root
MASTER_NODE_IPS="10.0.2.12 10.0.2.13"
for host in ${MASTER_NODE_IPS}; do
   scp /etc/kubernetes/pki/ca.crt "${USER}"@$host:
   scp /etc/kubernetes/pki/ca.key "${USER}"@$host:
   scp /etc/kubernetes/pki/sa.key "${USER}"@$host:
   scp /etc/kubernetes/pki/sa.pub "${USER}"@$host:
   scp /etc/kubernetes/pki/front-proxy-ca.crt "${USER}"@$host:
   scp /etc/kubernetes/pki/front-proxy-ca.key "${USER}"@$host:
   scp /etc/kubernetes/pki/etcd/ca.crt "${USER}"@$host:etcd-ca.crt
   scp /etc/kubernetes/pki/etcd/ca.key "${USER}"@$host:etcd-ca.key
   scp /etc/kubernetes/admin.conf "${USER}"@$host:
done
Run above script with user root of 1st master node.
root@k8s-master1:~# sh copy.sh
After running successfully copy.sh, the certificates will be located in directory /root of nodes: master2 and master3.
2.2. Steps for the rest of the master nodes
Move the files created by the previous step where scp was used:
$ vim move.sh

USER=root
mkdir -p /etc/kubernetes/pki/etcd
mv /${USER}/ca.crt /etc/kubernetes/pki/
mv /${USER}/ca.key /etc/kubernetes/pki/
mv /${USER}/sa.pub /etc/kubernetes/pki/
mv /${USER}/sa.key /etc/kubernetes/pki/
mv /${USER}/front-proxy-ca.crt /etc/kubernetes/pki/
mv /${USER}/front-proxy-ca.key /etc/kubernetes/pki/
mv /${USER}/etcd-ca.crt /etc/kubernetes/pki/etcd/ca.crt
mv /${USER}/etcd-ca.key /etc/kubernetes/pki/etcd/ca.key
mv /${USER}/admin.conf /etc/kubernetes/admin.conf
On node master2:
root@k8s-master2:~# sh move.sh
On node master3:
root@k8s-master3:~# sh move.sh
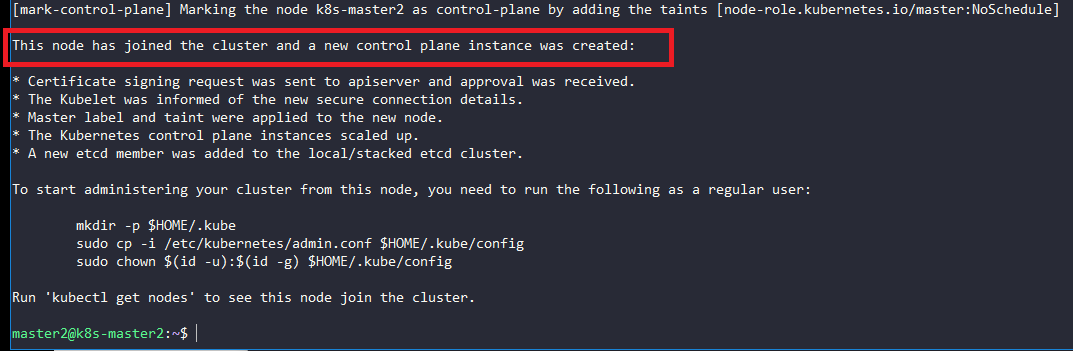
Start kubeadm join on nodes master2 and master3 using the join command in section 2.1 and add the flag --experimental-control-plane
On node master2:
$ sudo kubeadm join 10.0.2.33:6443 --token 7ju4yg.5x2xaj96xqx18qwq --discovery-token-ca-cert-hash sha256:4d7c5ef142e4faca3573984119df92a1a188115723f1e81dbb27eeb039cac1e0 --experimental-control-plane
On node master3:
$ sudo kubeadm join 10.0.2.33:6443 --token 7ju4yg.5x2xaj96xqx18qwq --discovery-token-ca-cert-hash sha256:4d7c5ef142e4faca3573984119df92a1a188115723f1e81dbb27eeb039cac1e0 --experimental-control-plane

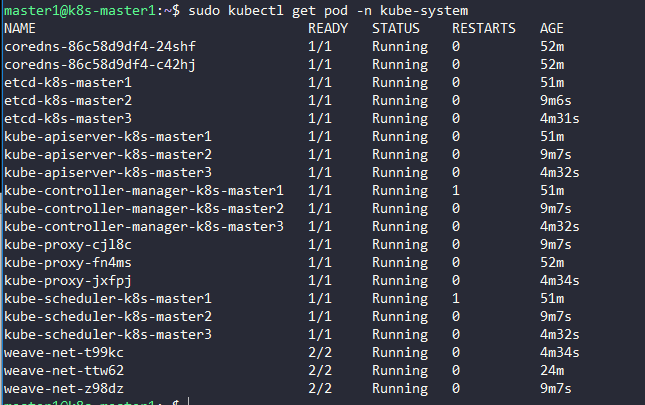
Verifying that the pods of the components are ready:
$ sudo kubectl get pod -n kube-system -w
2.3. Installing workers
All of worker nodes can be joined to the cluster by command:
$ sudo kubeadm join 10.0.2:6443 --token 7ju4yg.5x2xaj96xqx18qwq --discovery-token-ca-cert-hash sha256:4d7c5ef142e4faca3573984119df92a1a188115723f1e81dbb27eeb039cac1e0
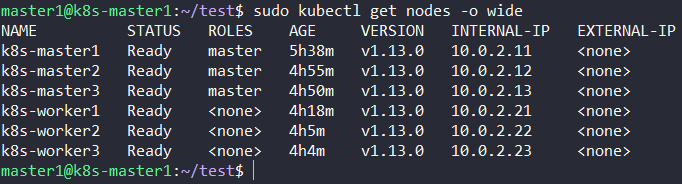
The result:
3. Reference
[1] https://kubernetes.io/docs/setup/independent/high-availability/
Author: truongnh1992 - Email: nguyenhaitruonghp[at]gmail[dot]com